Achieve Juicy & Tender Tri-Tip Every Time with This Easy Grill Guide
Imagine a steak so succulent, so packed with flavor, and so incredibly tender that you could almost cut it with the side of your fork. This isn't just a dream; it's the reality of a perfectly grilled tri-tip steak. Often overlooked, this triangular cut of beef has a reputation among those in the know as one of the best, most versatile, and surprisingly affordable steaks for grilling. If you've been searching for a foolproof method on
how to grill tri tip recipe that consistently delivers mouth-watering results, you've come to the right place. Get ready to impress your family and friends with this comprehensive guide to achieving tri-tip perfection.
What Makes Tri-Tip So Special?
Before we dive into the grilling process, let's take a moment to appreciate what makes tri-tip such a remarkable cut of beef. Cut from the bottom sirloin, the tri-tip is distinctively triangular in shape and offers a fantastic balance of tenderness and robust beefy flavor. It's often called the "poor man's prime rib" due to its rich taste and relatively lower cost, making it an excellent choice for feeding a crowd without breaking the bank.
While it might sometimes be a bit of a treasure hunt to find – as there's only one tri-tip on each side of beef – it's absolutely worth grabbing whenever you spot it. Its inherent tenderness and ability to absorb flavors make it a dream for grilling, promising a juicy experience with minimal effort. This truly is
The Underrated Tri-Tip: Grill The Best Inexpensive Steak For Your Family, and once you master grilling it, it’s sure to become a staple in your culinary repertoire.
Mastering the Art of Grilling Tri-Tip: A Step-by-Step Guide
Grilling tri-tip might seem intimidating given its size, but it's a surprisingly straightforward process that yields incredibly rewarding results. The key lies in careful preparation, precise temperature control, and a few simple techniques.
Preparation is Key: From Butcher to Grill
The journey to a perfect grilled tri-tip begins long before it hits the grates. Thoughtful preparation ensures even cooking and maximum flavor.
- Choosing Your Tri-Tip: Look for a tri-tip with good marbling – those tiny streaks of fat throughout the meat. Marbling melts during cooking, adding moisture and flavor. A lean tri-tip can still be delicious, but marbling ensures extra juiciness.
- Bringing to Room Temperature: This is a crucial, often overlooked step. About 30-60 minutes before grilling, remove your tri-tip from the refrigerator and let it rest on the counter. Allowing the meat to come to room temperature ensures that it cooks more evenly from edge to center, preventing a cold, raw interior or an overcooked exterior.
- The Perfect Rub vs. Marinade: Both rubs and marinades can elevate your tri-tip, offering distinct flavor profiles and textures.
- Dry Rub: For a savory, slightly spicy crust, a simple yet effective dry rub is fantastic. A popular blend includes salt, black pepper, cayenne pepper, granulated garlic, granulated onion, and a touch of sugar. The sugar helps create a beautiful caramelized crust. Generously coat every surface of the tri-tip with your chosen rub, pressing it gently to adhere.
- Marinade: If you prefer deeper flavor penetration and an extra tenderizing effect, a marinade is an excellent choice. A classic marinade often includes ingredients like soy sauce, olive oil, water, minced garlic, and ground black pepper. Place your tri-tip in a non-reactive bowl or resealable bag with the marinade and refrigerate for at least 4 hours, or ideally overnight, to allow the flavors to meld. Discard any leftover marinade that has come into contact with raw meat.
Tip: Whichever method you choose, ensure the entire surface of the meat is well-covered. This creates a flavorful crust and protects the meat from drying out.
Grilling Techniques for Optimal Juiciness
Now that your tri-tip is prepped, it's time to fire up the grill!
- Preheat Your Grill: For a phenomenal sear, you'll need high heat. Preheat your outdoor grill to a high temperature, around 450-500°F (230-260°C). Clean the grates thoroughly with a wire brush and lightly oil them to prevent sticking.
- Initial Sear: Place the tri-tip directly on the preheated grates, ideally fat-side down first if there's a significant fat cap. This allows the fat to render and baste the meat. Sear for about 5-7 minutes per side, aiming for a beautiful, deep brown crust. This initial high-heat exposure locks in juices and develops complex flavors.
- Indirect Cooking (Optional but Recommended): After achieving a good sear on all sides, many grill masters move the tri-tip to a cooler part of the grill for indirect cooking. Reduce the heat to medium (around 350-375°F or 175-190°C). Close the lid and continue to cook, turning occasionally, until the desired internal temperature is reached. This method ensures even cooking without burning the exterior.
- Monitoring Temperature & Doneness: This is the absolute most critical step to avoid dry, overcooked tri-tip. Invest in a good instant-read meat thermometer. Insert it into the thickest part of the meat, avoiding bone or fat.
- Rare: 125-130°F (52-54°C)
- Medium-Rare: 130-135°F (54-57°C) – Often considered ideal for tri-tip.
- Medium: 135-140°F (57-60°C)
- Medium-Well: 140-145°F (60-63°C)
- Well-Done: 145°F+ (63°C+) – Be cautious, as tri-tip can dry out quickly past medium.
Remember that the meat's temperature will rise by 5-10 degrees after it's removed from the grill (carryover cooking), so pull it off a few degrees before your target. If you have varied preferences at your table, like some liking it more well done, you can slice a piece from the narrower tip and cook it longer, while serving the center for those who prefer it rarer.
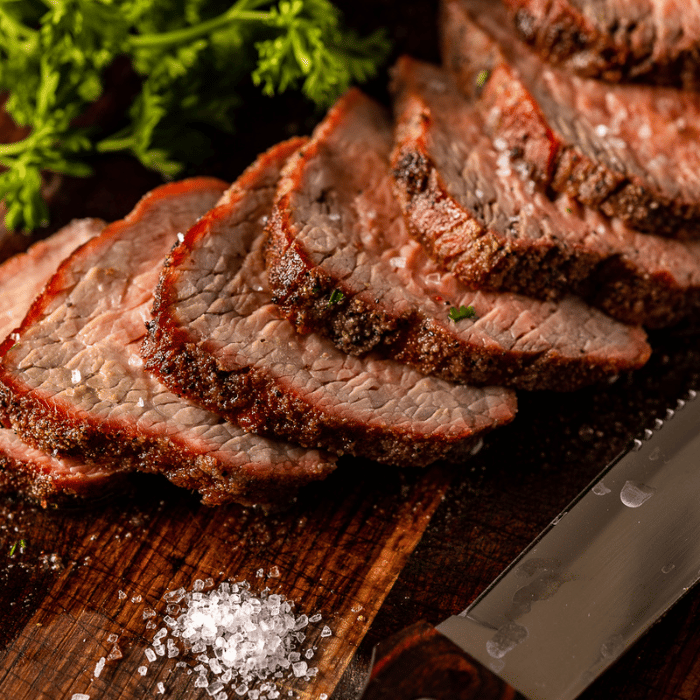
- Resting the Meat: Once your tri-tip reaches the desired doneness, remove it from the grill and place it on a clean cutting board. Tent it loosely with foil and let it rest for 10-15 minutes. This vital step allows the juices, which have been pushed to the center by the heat, to redistribute throughout the meat, ensuring every slice is incredibly juicy and tender.
- Slicing Against the Grain: Tri-tip has a unique grain that can change direction in different parts of the cut. For maximum tenderness, it's essential to slice the meat thinly *against* the grain. Look closely at the muscle fibers and cut perpendicular to them. This shortens the fibers, making the steak easier to chew and much more enjoyable.
Elevating Your Tri-Tip Experience: Sides & Serving Suggestions
A perfectly grilled tri-tip is a star on its own, but it truly shines when paired with complementary side dishes. Its robust flavor means it pairs well with an incredibly wide range of options, making meal planning a breeze.
For a comforting and hearty meal, consider serving your tri-tip with classics like buttery steamed green beans, fluffy salt potatoes, or even roasted sweet potatoes. If you're leaning towards something lighter, a vibrant sautéed zucchini or garlic and paprika roasted cauliflower can provide a delicious contrast.
Don't be afraid to experiment! Tri-tip also excels alongside fresh garden salads, grilled corn on the cob, or a crusty artisan bread to soak up any leftover juices. For busy weeknights, this steak can be a lifesaver, easily transforming simple ingredients into a gourmet experience. For more inspiration on quick and easy meal ideas featuring this fantastic cut, check out our guide on
Quick & Easy Grilled Tri-Tip Recipe: Perfect for Busy Weeknights.
Troubleshooting Common Tri-Tip Grilling Mistakes
Even with a comprehensive guide on
how to grill tri tip recipe, it's helpful to be aware of potential pitfalls. Avoiding these common mistakes will ensure your tri-tip is always a triumph:
- Overcooking: This is the most frequent culprit behind dry, tough steak. Always rely on a meat thermometer, not just visual cues. Pull the tri-tip off the grill a few degrees *before* your target temperature, accounting for carryover cooking.
- Not Resting the Meat: Skipping the rest period is a cardinal sin of steak grilling. If you cut into the meat immediately, all those precious juices will spill out onto your cutting board, leaving you with a drier steak. Patience is a virtue here.
- Slicing With the Grain: Ignoring the grain direction will result in chewy, stringy slices, even if the meat is perfectly cooked. Take the time to identify the grain and slice against it.
- Putting Cold Meat on the Grill: Grilling meat straight from the fridge can lead to uneven cooking, where the outside is done but the inside is still too rare. Allowing it to come to room temperature promotes even heat distribution.
- Insufficient Seasoning or Marinade Time: A bland tri-tip is a missed opportunity. Be generous with your rub, or give your marinade ample time to penetrate the meat for maximum flavor impact.
With these tips in mind, you're well-equipped to tackle any grilling challenge and achieve consistently delicious results.
In conclusion, grilling tri-tip is a truly rewarding experience, offering an incredibly flavorful, tender, and juicy steak that can easily become a family favorite. By understanding the unique qualities of this cut and following this detailed
how to grill tri tip recipe guide, you'll master the art of grilling and enjoy restaurant-quality results right in your own backyard. So fire up that grill, grab your tri-tip, and prepare for a steak experience that will have everyone asking for seconds!